
I often get asked: „How do you do your sketchnotes?“ Therefore I wanted to summarize my experience a little bit and help you to get started with sketchnoting.
- Why I started to sketchnote
- My evolution of sketchnoting
- How to do sketchnotes
- Tips for sketchnoters
Why I started to sketchnote
I enjoy attending conferences and meetings. When I’m at an event like that, I take notes, so that I can remember things better. When I’m back home after a conference, I like to go through my notes and research things I found interesting (like tools, methods, etc.). But I often had the problem, that just writing down „normal“ notes either on my smartphone or with pen and paper wasn’t that effective. It wasn’t really easy to follow what was being said and I tended to write down too much unnecessary information so that I didn’t find the most interesting parts very easily. Also, I was sad that I couldn’t share those handwritten notes with others, as they weren’t really readable or beautiful. So I often transferred them to a document on my computer which I shared with colleagues or other interested people.
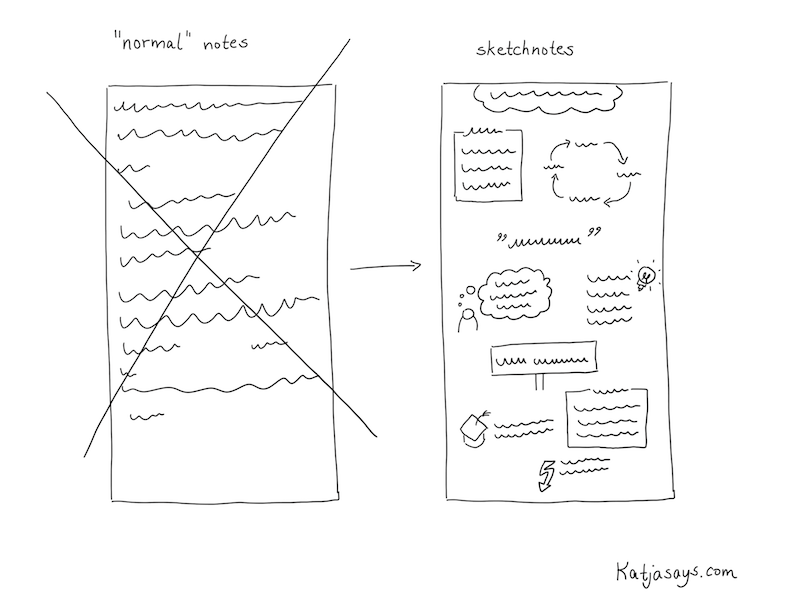
Here and there I saw people that did some sketchnotes or graphic recording at conferences. I thought that’s a cool idea, but I wasn’t sure if I can do that, as I’m not exactly the person who is a great artist. I didn’t think I can draw and that it would be very hard to get as good as those others. However, I really liked the idea of writing things down in a structured, readable way and playing with icons and colors. It is not only beautiful, but it’s also easier to remember stuff if you make it more attractive in a visual way. The other benefit is that you can share those visualizations with others. It is not possible to attend each and every event – there are just too many conferences around the world. So for me, it was always really interesting to follow people or hashtags on Twitter to see what is going on at events I couldn’t attend. Or even to see what other people share about the event I’m attending. With the help of sketchnotes, I was able to share my experience too.
The goal for me was to make my notes more beautiful for me so that I can follow along with my thoughts after returning home a little better. And also I wanted to share it with others so that they could get to know about the content as well. I thought: „If I can help one person to get an idea of what’s going on at an event I attend, that would be really awesome.“ Spoiler: I now get a lot of responses for my sketchnotes and people seem to really enjoy that I share my experience in such a structured way.
My evolution of sketchnoting
In the beginning I bought some notebooks and pens to start doing sketchnotes on paper. In the store, I got overwhelmed by the choice of colors so that I ended up buying almost every color in the store. The notebook I chose had thick pages so that the ink wouldn’t bleed through to the back of the paper and I chose the format A5, as it was easy to carry around and fit in small bags. Everything went well and I liked the feeling of writing and drawing with actual pens on paper, but the problem was the digitalizing of the sketchnotes. There are loads of apps to make good pictures and even apps that add a whiteboard background to them to make the sketchnotes easier to read and of a better quality. But still, you have to take a proper picture. Which can be challenging at a conference, as there often isn’t enough light, or if there is light, you have a shadow on your sketchnote from the smartphone. Also, it takes time to take a good picture. You need to have a good underground (like a table, so that the sketchnote lies down in a flat way) or help from a second person and often you need to use a flashlight, which might annoy others around you. Therefore I started dreaming of a possibility to make the sketchnotes on an electronic device so that they are stored digitally from the beginning. This has a huge effect on the quality and you can share them in just some seconds.
I tried different solutions, like smart writing sets that use a pen that has an integrated camera that transfers what you write onto a screen. But they didn’t really satisfy me as not all the strokes I made with the pencil were detected and changing colors was really complicated. A friend of mine had an iPad and an Apple pencil and she allowed me to try to sketch something with it. And what can I say – it was love at first sight. I started saving money and bought an iPad and an Apple pencil for my birthday. Since then I’m doing my sketchnotes digitally. I tried lots of different apps until I chose „Sketches“ by Tayasui. It is very easy to use and has all the functions I need. There are more elaborate apps like Procreate, but those have just too much not needed functionality for me. However, everyone has to choose an app that is most suitable for them.

How to do sketchnotes
- Prepare your schedule of the event
- Prepare the sketchnotes before the event
- At the event: Find a good spot
- Listen carefully, don’t get distracted
- Start with writing down text
- Add some borders etc. for the structure
- Add some icons to the text
- Add some colors
- Sign the sketchnote, add your handle
- Share your sketchnote with others
- Enjoy the reactions
Now you know why I started to sketchnote and what tools I use. So let’s come to the interesting part: How do I do my sketchnotes. I share my way of sketchnoting because everybody needs to find their own path.
Before I attend a conference, I have a thorough look at the agenda. I choose the talks I want to see and write those down. As I want to share my sketchnotes of the talks on Twitter, I search for the Twitter handles of the speakers and write them down next to the talk name. That helps a lot because after the talk there is usually not enough time to search for the speaker on Twitter (if they don’t mention their handle on their presentation). For the last couple of conferences, I started to draw portraits of the speakers. It’s just something I want to try and what I enjoy more and more. I prepare those portraits in advance. So after choosing the talks I want to attend, I prepare sketchnotes for them. I write down the title of the talk, the Twitter handle of the speaker and sometimes I draw a speaker portrait from the pictures that are exposed on the website of the conference.

Then the day of the conference arrives. In the room, I try to find a spot where I can sit quietly and won’t be interrupted that much. Usually, I like to sit at the end of a row, so that I can get up fast to change rooms and also because at least on one side there’s nobody sitting next to me who might be shaking my chair. The most important part is to have a good look at the presentation screen so that I can see and read everything easily. I have to listen very thoroughly what the speaker is talking about. Usually, in the beginning, there is some time spent on an introduction of the speaker and the speaker’s workplace. I don’t write that down. The challenge is to filter the information that is important and write it down. And at the same time continue to listen what the speaker continues to talk about. In the beginning, this is really hard and you can get the impression that you miss important stuff, but you will get used to it and it will get a little easier. So I’m very focused when listening to a talk. Priority number one is to write down the most important information. I try to think about what somebody needs to read to be able to understand what the talk was about, even if that person wasn’t present. Then, if there is time, I add some small icons to make the sketchnote more attractive visually. In the end, I add colors (sometimes during the talk if there is some time left). My time scope is: Start with a sketchnote the minute the speaker starts talking, finish the sketchnote when the talk is over and share it on Twitter immediately.
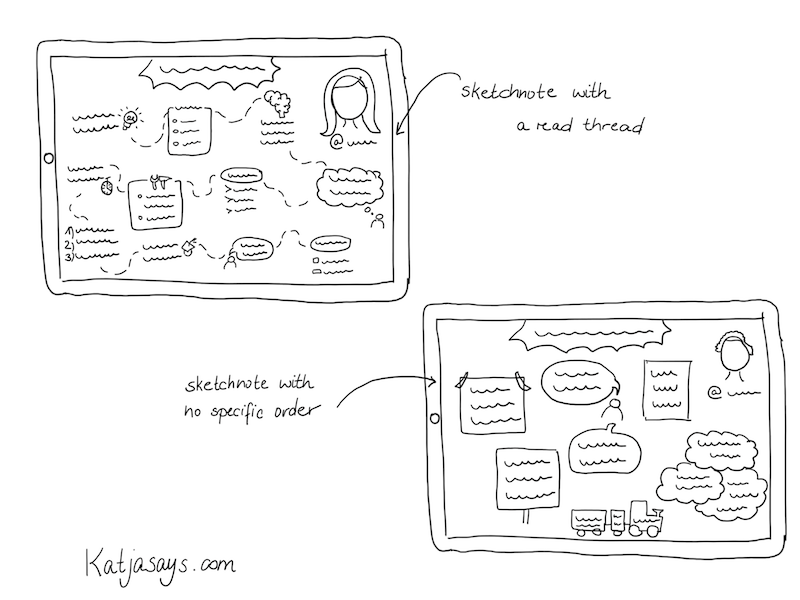
With experience, I got a good routine and now I know better how to fit a talk onto one page and how to structure it in an easy to follow way. But everybody has to find an own style of presenting the information. That can be in terms of icons you use (I have a set of icons I use regularly and I add some new once upon the appearance of new keywords and information), the color scheme (I now tend to use only a few colors to not overwhelm the reader) or the structure. Typically I try to use a red thread so that the reader can follow the information and knows, where the talk started or ended. Some information is written down in borders like boxes or signs or clouds or whatever seems fitting for me. Some talks don’t depend on following an order – then I just use borders or colors to separate the topics from each other. You just need to find a way that is most suitable for you – even if it differs a lot from the sketchnote you have seen others doing. The „typical“ sketchnotes I saw before I started doing some myself where highly visual with a lot of pictures, icons or colors and not so much text. Those are really beautiful but they don’t fulfill what I expect from my sketchnotes. I want them to be understandable for everybody and that, at least in my opinion, requires some more text.
Tips for new sketchnoters
- Do it and overcome your fear
- Practice by sketchnoting videos
- Do them for yourself
- Find your own style
- Start small
The most important thing is: Just do it. Overcome your fear of not being good enough and just start doing sketchnotes. Forget the thought of them having to be perfect. Just try it. First, you can start with writing down the information and structure it in a way you are comfortable with. For example by using borders, boxes, different shapes to surround the information and arrows to connect it and to show the order. Then you can try to add some icons every now and then and to work with colors.
To get a little experience, you don’t need to do the sketchnote in public, for example in the middle of a crowd at a conference, but you can start to do sketchnotes of podcasts or recordings.
Forget the thought of somebody not liking your sketchnote. I never saw that somebody said that a sketchnote looks ugly – I always got nice feedback because at least you try to do them and they look much better than „normal“ notes that people make. Do the sketchnotes for yourself and not for somebody. If you share them and you don’t get any reaction – don’t be sad. At least you have some beautiful notes for yourself.
Find your own style. You are not comfortable with drawing portraits? Then don’t do it. You don’t know how to draw specific items? Then don’t draw them. Evolve at your own pace. Start small and try to add more and more things to your sketchnote until you find a format you are comfortable with. When you have found your style, try to use it consistently so that people can recognize your work. Don’t be afraid to experiment.
I hope you like my story and that you can learn something for your own sketchnoting story. I’m happy to get to know about your experience and don’t hesitate to ask for some advice – I’m very happy to help you. Just reach out to me, send me your sketches or mention me on Twitter.
[…] How to sketchnote – the story of Katjasays – Ekaterina Budnikov – https://www.katjasays.com/how-to-sketchnote-the-story-of-katjasays/ […]